

How To Set Up Audio In Obs Studio
| Parameter | Recommended setting |
|---|---|
| Base (Canvas) Resolution | Adjust to the size of the video you lot desire to capture – e.yard. 1920 × 1080 to match the size of your monitor for 'full screen' capture at 1080p. |
| Output (Scaled) Resolution | Adjust to fit your output file format or the recommended playback or streaming format for your preferred platform. |
| Common FPS (frames-per-2d) | sixty FPS |
| Downscale Filter | Bicubic |
| Recording format | MP4 |
| Bitrate | sixteen,000 |
| Preset | MaxQuality |
| Charge per unit Control | CBR |
| Encoder | X264 |
| Process Priority | In a higher place Normal |
| Renderer | Direct3D eleven |
| Color Format | NV12 |
| Colour Space | 709 |
| Colour Range | Full |
How to get all-time-quality screen recording videos in OBS Studio
OBS – Open Broadcaster Software – has avant-garde features for both capture and streaming. Just to get a polish output, yous must know how to ready up OBS for recording.
Residual your settings
To optimize for the best recording settings for OBS, you'll need to pre-configure specific settings that apply to every recording. These base settings help you capture with improve quality overall and should remain as a default.
To configure these settings, access the Settings carte by clicking File >Settings. A window will appear that lists options to modify settings in a variety of categories like Output, Audio, and Video.
Nosotros'll use these categories to:
- Fix your video capture parameters
- Fix your video recording parameters
- Fix streaming parameters for your screen recording
Motorcar-configuration tool
An auto-configuration tool will popular upwards when you outset open OBS Studio. From here, you can adjust the settings to friction match the specs on your reckoner. But if you need to farther adjust your settings – as shown in the sections beneath – you'll render to the Settings carte du jour.
Follow the instructions in each category to optimize for the best OBS recording settings in any situation.
Set video capture parameters
You can better the quality of your videos by clicking the Video category from the Settings menu. Hither, you'll observe options that let you to capture the smoothest videos possible inside the platform. Adjust the following settings for optimal capture recording functioning.

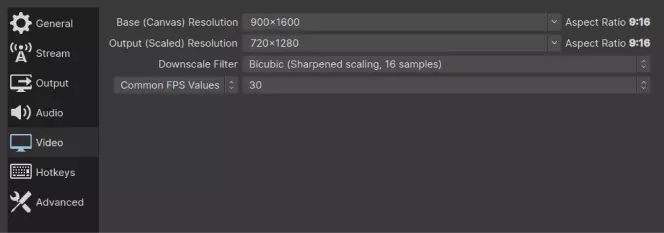
1. The Base (Canvass) Resolution
Represented by width ×summit, this resolution represents the dimensions of your capture area. Information technology'due south all-time to friction match it to the settings on your monitor, but you can likewise create a custom capture window. 1920 × 1080 is standard 1080p HD recording.
two. Output (Scaled) Resolution
The resolution for your output (Scaled) doesn't have to lucifer the resolution for your capture (Canvas). But to create better quality videos, it'due south best to practice so. For optimal playback on a specific platform, brand certain your resolution settings are uniform. If non, you'll want to adjust your settings to match the platform'southward upload standards.
3. Common FPS (frames-per-second)
FPS – besides known as frame rate – determines how many frames per second your video will record. This affects the quality of your video, as more frames requite you a smoother picture. 30 FPS or sixty FPS are the superlative settings based on your storage chapters.
sixty FPS has a higher recording bitrate and takes upward more than storage. But if you want your viewers to experience no lag while watching gameplay videos and other loftier-quality content, this is the best option.
4. Downscale filter
When your resolution output is smaller than your recording, the video must downscale to lucifer the size. That'due south the task for this filter. Lanczos provides the highest quality downscaling, just not every figurer can handle this filter. Therefore, nosotros recommend sticking to Bicubic, unless your system can handle Lanczos.
Set your video recording parameters
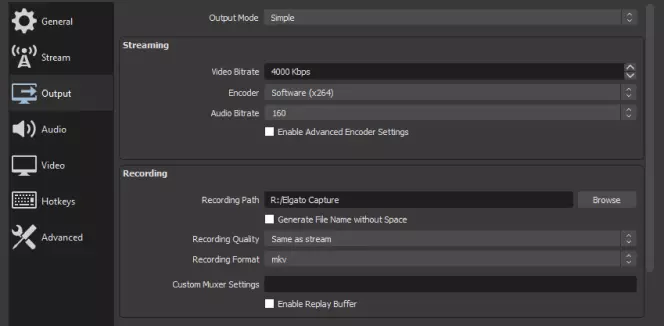
Click Output from the Settings menu. From here, yous tin choose either Elementary or Advanced to change a wide variety of output settings.
There are no actual parameters for this section, as everyone has different recording needs and systems. Merely we'll explore those settings in the sections beneath.
For now, click the dropdown bill of fare next to Recording format and select MP4. Information technology'southward the about unremarkably used video format to engagement.
Set streaming parameters for your screen recording
Streaming is some other area that can have a lot of settings based on your needs – meet below. But here are 3 settings you lot can use equally defaults for well-nigh streams, bold you're streaming in 1080p full Hard disk at 60 FPS.
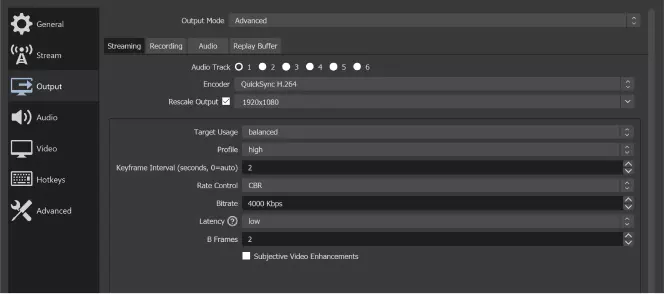
To access, click Output under the Settings window. Then select Advanced from the carte du jour next to Output Fashion. Click the Streaming tab and use these settings:
- Prepare the Bitrate to 4,000.
- Ready the CPU usage to veryfast.
- Select X264 as your encoder.
The all-time OBS settings for recording
The section above provides a default list of settings you can utilise in most recording or streaming situations. Now we'll explore each Settings category, so you'll know how to use the best OBS settings for recording based on your projection.
General settings
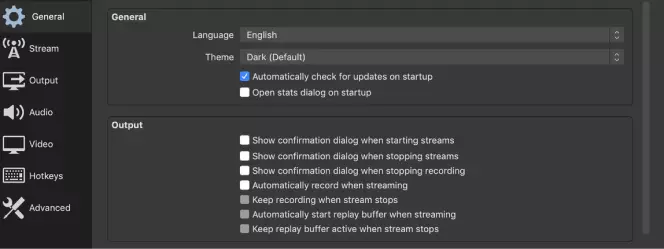
The General tab within the Settings window has settings that impact your experience of the platform. There's goose egg on the menu that affects the quality of your audio or video. Explore these settings and encounter what might exist helpful in your video cosmos process.
Output settings
We saw this card earlier, but let's take a closer look. This menu allows you to customize the encoding and format settings for your videos and streams. To commencement, click Advanced nether the Output Fashion dropdown carte and use these OBS high-quality recording settings:
Encoder
To create a video, yous demand the program to encode the information in the video into a specific format. And your graphics carte determines how fast your system can encode that information.
Many articles on 'How to optimize OBS for recording' state that you should use the NVENC H.264 setting. And they're correct because this setting creates the highest quality videos and streams.
Simply this setting requires an NVIDIA graphics card you may not have installed in your system. That's why we recommend the x264 as the default recorder.
If y'all accept an NVIDIA graphics carte, apply the NVENC H.264 setting, and you'll definitely run across a difference when recording or streaming games.
Rate Control
The rate control setting tells your organisation how you desire to allocate the bitrate you're using. CBR puts out consistent, quality video clips, doesn't stress your motherboard, and gives y'all complete bitrate command.
Nevertheless, if you accept an NVIDIA graphics menu installed, so CQP is the setting with the highest quality. Simply know that this setting puts out large video files, and is mainly used by those recording videos in 4k.
Bitrate
You can ever set custom bitrates to match the quality of the video yous want to put out. Just remember that when you increment the bitrate, you lot increase the size of the file. If you have the storage space, you can set a high bitrate like sixteen,000 for total Hard disk recordings to get a crisp video.
Merely if you're recording videos for tutorials or conferences, and potentially only playing back in 720p, yous tin can lower things down to three,500.
Video Settings
Both Base (Canvas) Resolution and Output (Scaled) Resolution depend upon your output needs. You can e'er match the settings to the size of your monitor to get the full screen, merely you don't take to. Nonetheless, this is best do to get the highest quality video output. Think to set your bitrate to either xxx or lx FPS.
Sound Settings
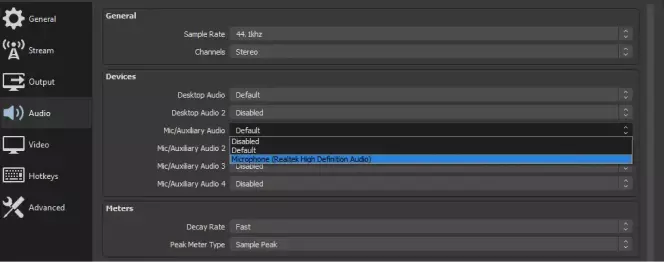
Under Audio, well-nigh of the default settings are fine for whatever standard video. Just be sure that you prepare the platform to get your sound from the correct source.
If you're using your computer'southward internal audio output, then select Default next to Desktop Audio. And if you're using an external mic, and so select your mic from any of the 4 Mic/Auxiliary Sound options.
Using avant-garde settings for OBS

The concluding two settings categories are Hotkeys and Advanced. Hotkeys doesn't really affect your video output, so let'south expect at Avant-garde. Hither, you'll want to incorporate the post-obit settings for high-quality videos:
- Set your processing priority to In a higher place Normal.
- Gear up the renderer to Direct3D 11.
- Set your colour settings to NV12, 709, and total.
How to optimize OBS for recording
How to fix OBS for game recording
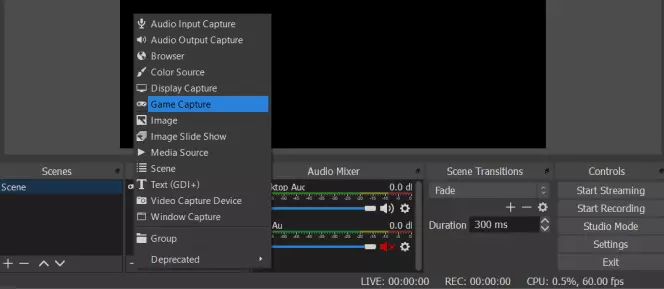
To record gameplay, you'll click the + sign under Sources and select Game Capture from the menu. From here, you can choose whether yous want to record your full screen or a specific window.
If capturing a window, be sure that your Base (Sheet) Resolution matches the resolution in the game's window. And be certain to visit your Audio settings if you're using an external mic for narration.
How to set up OBS for low-finish or bad computers
Many of the settings above are for modern, higher-powered computers. If yous're working with a low-finish figurer, and so you'll desire to set things up based on the specs of your system to create the smoothest possible video.
The best way to adjust for this is through the resolution. Get to your Settings carte and then click Video. Then, drop your resolution settings until things smoothen out. Your video quality volition be lower, merely at to the lowest degree you'll lower the chance of lag and create a fluid viewing feel.
How to set up OBS for online conferences and lectures
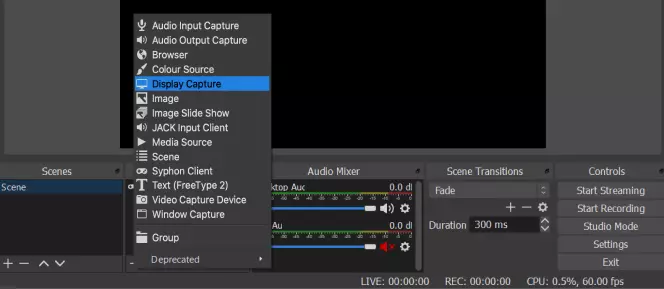
For lectures and conferences, information technology'south improve to choose Display Capture from the Sources menu. Once again, yous'll want to conform the Base (Canvas) Resolution to lucifer your brandish.
If you lot're recording your own lecture, and then apply a mic for the best sound. Merely exist certain to set things upwardly in the Audio settings first.
How to set up OBS for streaming
For streaming, the settings in the previous sections will work for most scenarios. To optimize your streaming, y'all'll desire to focus on your bitrate and FPS. This is where your internet speed comes into play. Yous'll demand a faster internet connection to put out higher-quality streams with college bitrates.
Here'southward a short guide you can use to gear up bitrate and FPS for streaming:
- 720p video at 30 frames per second – one,500 to 4,000 kbps
- 720p video at sixty frames per second – 2,500 to 5,000 kbps
- 1080p video at 30 frames per second – 3,000 to six,000 kbps
- 1080p video at sixty frames per 2nd – 4,500 to nine,000 kbps
Acme alternatives to OBS
Not a fan of OBS? Below are our breakdowns of some height alternatives.

Best for: Recording lectures and full general online content
Bone: Windows and macOS
Price: Free trial, Rp 319'000/year, and Rp 399'000/lifetime
G2 rating: 4.5 out of 5, 50 reviews
With Movavi Screen Recorder, users have an easy, convenient platform for recording their screen. Use the program to record things like online tutorials, events, lectures, and conferences. Gear up is quick and easy, and the programme has a lot of superb features to help yous edit videos after you capture.
Fundamental features
- Show your keystrokes
- Capture your screen and webcam
- Record just audio
Pros
- Easy-to-use interface
- Works fast and seamlessly
- Lots of interactive controls
Cons
- Offers free version, merely you have to pay to employ all features
Best for: Video game recording and streaming
OS: Windows
Toll: Costless trial, Rp 299'000/lifetime
Steam rating: vi out of 10, 43 reviews
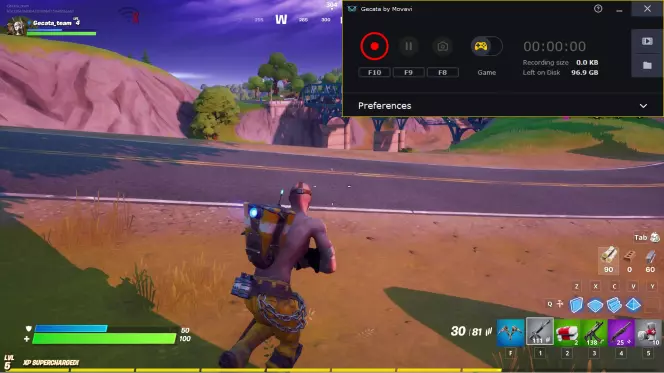
Gecata by Movavi is the company's recording and streaming solution for serious gamers. The platform is convenient and allows users to optimize loftier-quality videos for their viewers.
Y'all can record both video and audio, in-game or through an external mic. The plan tin can as well add webcam recordings into your video to bear witness narration and your reactions to what's happening.
Central features
- Two-way audio capture
- Full capture controls
- 4K video recording
Pros
- No functioning loss
- Offers hardware acceleration
- Video and audio recording
Cons
- Not available for Mac
- Watermarks on the free version
Windows 10 Game Bar
Best for: Quick solution
Bone: Windows
Cost: Free
PCMag rating: three.v out of v
The Windows 10 Game Bar is already built into whatsoever PC with Windows ten installed. The program is fickle with its functionality, but Microsoft has given it some upgrades over the years. It'south a solid tool if you demand a quick solution for video recording or streaming, simply there are better options available.
Primal features
- System performance monitor
- Can play music from Spotify
- Works for games or any application
Pros
- Works well when it works!
- Already built into Windows 10
Cons
- Inconsistent performance
- Game Bar doesn't e'er appear when yous desire it to
Summary
Setting up OBS to record for streaming, gaming, and video conferences is fairly straightforward. With the tips and tricks nosotros've discussed hither, you should be able to create quality videos by recording your screen and/or webcam activity. If you lot're looking for a good alternative to OBS Studio that volition aid you brand high-quality videos, we recommend trying out Movavi Screen Recorder or Gecata by Movavi.

Ben is a writer from the UK with qualifications in Media and Music Applied science, he specializes in software reviews and tutorials. Ben has been blogging most media and tech subjects since he was a teenager from his base in the E of England.


Movavi Screen Recorder
The perfect style to tape from your screen
Oftentimes asked questions
What are the best settings for OBS recording?
For many users, the best settings for OBS recording are:
- Video file format: MP4
- Audio track: ane
- Encoder: x264
- Bitrate: 40,000 (or 15,000-25,000 if yous're working with a lower-cease computer)
How do I set up OBS for recording?
When you outset open up OBS Studio, you should be prompted to go through the machine-configuration process. If the Auto-Configuration Magician tool doesn't automatically pop upwards, you can find it in the Tools menu at the top of your screen. Run this tool to let OBS automatically check your system'south requirements and attempt to notice the settings appropriate for your computer. This should include the settings for your recording, resolution, encoder, bitrate, and other settings.
In one case you've run the auto-config tool, cheque that OBS is set upward for your preferred audio device. You can do this by clicking Settings > Audio. Then verify that it has the correct audio device selected or change information technology if you're using some other device.
Next, you'll need to add your video source(s). Discover the Sources box at the bottom of the screen and click +. This volition give yous several options, including Game Capture, Window, or Video Capture Device (for capturing webcam video). Select the appropriate video source(s), and you'll exist ready to commencement recording.
How practice I ready OBS for recording games?
To record gameplay with OBS, go to Settings > Audio to ensure that your audio output is fix correctly to your internal computer sound or to an external microphone if you're using one. Next, go to the Sources box at the bottom of the screen. Click + and select Game Capture. This will ensure that you lot record the window for your game and no other video sources.
Why is my OBS recording laggy?
If the video yous're capturing isn't lagging, only your OBS recording is, yous likely need to reduce your bitrate and/or turn downwardly your resolution settings for your game. If the problem persists, and you lot know that your estimator is not lagging, yous might want to attempt an alternative video capture application, like Movavi Screen Recorder.
Source: https://www.movavi.com/learning-portal/best-obs-settings-for-recording.html
0 Response to "How To Set Up Audio In Obs Studio"
Post a Comment