

How To Set Up Water Line For Refrigerator
How to Install Fridge Plumbing
Updated: Jun. 26, 2022
Here's how to run a water line to your refrigerator'due south icemaker.
This article will evidence yous how to run a h2o line to your refrigerator for an automated ice maker and water dispenser. The story and how-to photos cover tapping into an existing water pipe (the toughest office of the chore) and attaching copper tubing to the fridge. If you lot're replacing your old refrigerator, this DIY project covers everything you need to know to install the plumbing.
You lot might too like: TBD
- Fourth dimension
- Complexity
- Price
- A full day
- Intermediate
- $51–100
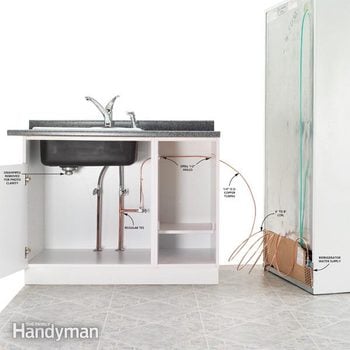
Plumb the fridge

Soldered connection
The 1/4-in. copper tubing connects to an existing cold water line.
The biggest challenge when running a refrigerator h2o line is tapping into the common cold water pipe and running the 1/4-in. O.D. (outside diameter) flexible copper tubing. You can buy icemaker installation kits at home centers and some hardware stores, but nosotros don't recommend them. Nigh contain a saddle valve (which doesn't meet plumbing lawmaking in some regions) and some contain plastic tubing (which tin can dry, split up and leak over time). Nosotros recommend more than permanent valves and copper tubing for improve water menstruum and reduced chance of leaks, which can cause all-encompassing damage.
To start, locate the common cold water source nearest to the fridge—perhaps under the kitchen sink, below the floor, in the wall or even in the ceiling. In this kitchen, we ran the new refrigerator h2o line from under the kitchen sink through cabinets. (Note: We removed the drainpipes to clearly show this project.) Be sure to keep the tubing in a higher place storage areas and backside drawers if possible to avert tube damage. If you demand to drill through floors or walls, check for air ducts, electrical wiring, plumbing or other possible impediments first. Next, calculate how many feet of 1/four-in. O.D. flexible copper tubing yous demand for the refrigerator h2o line. Figure 6 to 8 ft. of actress coiled tubing behind the fridge so you tin pull it out for cleaning and service.
Then determine which one of iii refrigerator h2o line connectedness options y'all will use: a regular tee fitting that is soldered, a pinch tee fitting or a saddle valve. Plumbers recommend removing a section of the common cold water pipe to solder in a regular 1/2-in. copper tee. If you have CPVC (plastic) or steel pipes, add tee fittings made of the same material. If y'all don't desire to solder, y'all can cut the copper water pipe and install a v/8-in.O.D. pinch tee instead (just don't use them inside walls considering it'due south not safe and plumbing code won't allow it). Add pipe compound to the threads to make it easier to tighten compression joints.
The least dependable option is a saddle valve designed for ane/2-in. copper pipe. It has a tiny shutoff valve that uses a sharp pointed metal rod to pierce the outer wall of the pipe when screwed inward. Then you back out the rod and h2o flows through a tiny hole into the tubing. Some appliance installers say saddle valves piece of work, only most refrigerator makers recommend that y'all drill a hole in the pipe for better menstruum instead of using the valve to pierce the hole, then attach the saddle valve (cheque your owner's transmission).
To begin, close off the h2o at the chief valve, then open the sink faucet and another lower level faucet to drain the pipe. Next, cut out a small section of the common cold h2o pipe and solder in a copper tee. Cut a 3- to 4-in. slice of copper pipe and solder information technology into the tee under the sink, then solder a water supply stop valve on the other terminate. One time the assembly has cooled, close the new valve and open the water master to check the fittings for leaks.
Then programme a tubing route through all the cabinets (avoiding abrupt turns that can kink tubing) and drill 1/2-in. holes as needed between cabinets. To straighten coiled tubing (non the entire curl), take a partner hold the end of the tube apartment on the floor, so push the coil against the floor while unrolling to the length you need to become through the cabinets. Now snake the tubing in backward, starting at the fridge and so the coiled portion remains at that place.
Next, adhere the ane/iv-in. fridge water line to the cease valve with a pinch joint. And then attach the tubing to the back of the cabinets every ii to 4 ft. using ane/four-in. nylon wire/cablevision clamps. Once you're exterior the last cabinet, don't attach whatsoever clamps; just run the tubing to the floor near the water line hookup on the fridge. But practice clamp the tubing to the fridge.
Don't forget to flush out the tubing by running a gallon of water through the new line into a saucepan before you adhere it to the fridge. To attach the tubing to the refrigerator, follow the possessor'due south manual.
Normally the compression fittings come with the fridge. Earlier y'all cut the tubing to its last length, make sure you have 6 to 8 ft. of coiled tubing that volition remain coiled and stored behind the fridge when yous push it back into identify.
Be sure to cut the end of the tubing square. Then slide on the pinch fittings, lubricate the threads on the fridge fitting with pipe compound and screw on the tubing. Important: Hand-tighten the fitting, then tighten three-quarters of a plow using a small wrench on both sides of the plumbing equipment. Once information technology's attached, open up the new finish valve and cheque the entire refrigerator water line piping arrangement for leaks.
Alternative connections
These photos show alternative means to connect to the cold h2o pipe.
Required Tools for this refrigerator water line project
Have the necessary tools for this refrigerator water line DIY project lined up earlier you start—yous'll salvage time and frustration.
You may also need a drill and a 1/ii-in. fleck if you lot demand to run the water line through cabinets, as shown here.
Required Materials for this fridge water line project
Avoid last-minute shopping trips by having all your materials ready alee of time. Here'due south a list.
If your pipes are steel or plastic, utilize that material for the tee instead of copper.
Originally Published: June 26, 2022

How To Set Up Water Line For Refrigerator,
Source: https://www.familyhandyman.com/project/how-to-install-refrigerator-plumbing/
Posted by: wilsonwereaujubmis1977.blogspot.com
0 Response to "How To Set Up Water Line For Refrigerator"
Post a Comment